Monday, July 30, 2012

Homemade Marinara Sauce

Homemade marinara sauce is easier to make than you think!  Here is my simple go-to recipe and it comes out delicious every time!

Homemade Marinara Sauce (perfect for one 1lb of pasta)

Ingredients:
- 1 large can crushed tomatoes (use fresh if they're in season- San Marzano are the best if you have to use canned)
- 1 regular can plain tomato sauce
- 2 tbsp olive oil
- 5 cloves garlic, minced
- 1/2 vidalia onion, chopped
- 1/4 cup fresh basil, minced
- 1 cup red wine (use whatever kind you like)
- 1 tbsp sugar (sounds weird but it brings out the sweetness of the tomatoes)
- 1 tsp red pepper flakes
- Freshly cracked salt and pepper

Preparation:
- Heat olive oil on medium.
- Add onion; season with salt and pepper.
- Saute onion until almost translucent.
- Add garlic and cook for another 1-2 minutes.  Stir often so as not to burn the garlic.
- Add red wine and cook down until wine is evaporated
- Stir in tomatoes, sauce, hot pepper flakes and sugar.
- Simmer for 20 minutes on low heat.
- Remove from heat and add basil.
*It is important to taste your sauce before serving.  Sometimes tomatoes can be sweet or sour, depending on when they were canned.  Adjust your seasonings accordingly.
- Always use fresh basil.  It makes a huge difference.


Late in the game, I usually toss in a bunch of freshly grated Parmesan cheese to give the sauce sharpness and creaminess.  Basic marinara doesn't have to have cheese, so cater it to your tastes.

Enjoy!

Local Eggplant Lasagna

Going to the farmer's market on a Sunday morning is the best thing.  Ever.  Our favorite thing to do is grab a latte and stroll around the market, taking in the sights and looking for great local produce.  Things have been so hectic the past few months that I can count on one hand how many times we've been this season.  We were able to steal away a few minutes last Sunday and what a great idea that was!  We made out like bandits with delicious local tomatoes, yellow squash and zucchini.

Now, I'm Italian.  This is not a trait that makes it easy to be a healthy cook because cheese is such a staple in Italian food!  I'm always trying to recreate childhood favorites in a lighter, "lower in cheese" fashion.

Who doesn't love lasagna...

I don't know a single person.  That said, the pasta in this recipe is substituted for eggplant and I do know plenty of people who don't like eggplant.  Personally, I'm not the biggest fan of eggplant unless it's super mushy, but that's just my own personal taste.  This recipe is sure to make any eggplant hater a believer!  If you really have an aversion to it, just substitute zucchini, squash, bell peppers...just about any other vegetable that you love that would taste good with red sauce.

Eggplant Lasagna
This is a lot easier than it looks and the whole pan is only about $5-6!

Ingredients (serves 8):
- Homemade marinara sauce (if you're in a hurry, use your favorite jar of marinara sauce)
- 1 medium eggplant, sliced into thin rounds
- 1 small container low fat ricotta
- 1 egg
- 1/4 cup shredded parmesan cheese
- 1/2 cup shredded Italian cheese blend (you can sub any kind of cheese you like here, just don't overdo it!)
- 1/2 one vidalia onion, chopped
- 2 tbsp fresh parsley, minced
- 2 tbsp fresh basil, minced
- Freshly cracked salt and pepper

Preparation:
- Preheat oven to 400F
- Soak sliced eggplant in salted water for a few hours.  Remove eggplant and pat dry before assembling lasagna. VERY important or else you will have watery sauce!


Shot of the fresh basil.


Shot of the fresh, homemade marinara.


- Mix the ricotta, egg, salt, pepper and 1/4 cup of parmesan cheese.


- Coat the bottom of your baking pan (I used a 13x9 pan) with sauce.


- Layer an even sheet of eggplant slices on top of sauce.  Top each with a spoon of the ricotta mixture.


- Keep building with sauce in between each layer...cram 'em in there and squish down so that the flavors combine.  Scatter fresh herbs all around while you're building the layers.


- Put a generous layer of sauce on top so that the eggplant can cook through.


- Top with 1/4 cup of your favorite Italian cheese.  Wrap very tightly with foil.


- Bake at 400F for one hour.  No peeking!  Test to make sure that the eggplant is soft before you remove it from the oven.


* See how runny the sauce is above?  We were in a hurry and ate right away.  What I usually do and always suggest is to let the lasagna rest under the foil for 15-20 minutes after taking it out of the oven.  It will still be hot and this way, the water will reabsorb into the dish and it will be more solid and less runny.


Here's a shot of the finished product and YUM was it good!


I even served this the next night on top of pasta with some broccoli.  I don't believe in wasting delicious leftovers!

Enjoy!!

Wednesday, July 18, 2012

Grilled Rosemary Chicken with Lemon

Since it's summer, I've been so preoccupied with having fun and going out to eat that we haven't been home to make many meals!  This one was a really simple one and turned out delicious!  We had a few people over and it was a nice day out, so chicken and grill to the rescue!

I made this recipe using all ingredients that I had on hand.  I always have individually frozen chicken breasts in the freezer because they're so versatile and healthy.  Just pop them in the fridge the night before you need them and they're all thawed out whenever you need them!

Fresh herbs, bright lemon flavor and a touch of sweetness make this recipe perfect for summer!

This is so easy and delicious.

Grilled Rosemary Chicken with Lemon

Ingredients: (serves 8)
- 8 boneless, skinless chicken breasts, tenderized
- 2 tbsp fresh rosemary, minced
- 4 tbsp olive oil
- 3 tbsp poultry seasoning
- 2 tbsp light brown sugar
- 6 cloves garlic, minced into a paste (so it doesn't burn on the grill)
- 1 lemon, juiced
- 1 lemon, zested (use the same lemon that you're juicing)
- 1/4 cup brown sugar
- Freshly cracked salt and pepper to taste

Preparation:
- Place chicken breasts in a baking dish to marinate
- Season chicken with salt and pepper on both sides
- Mix all other ingredients in a bowl; pour over chicken
- Marinate for 30 minutes or longer if you have time
- Grill chicken until it's cooked through (about 6 minutes on each side)
- Baste chicken liberally with leftover marinade while grilling

Happy grilling!!

French Onion Greek Yogurt Chicken

I love chips and dip.  That's right...the fattening kind.  Whether it's corn chips and salsa/guac or Fritos/potato chips and onion dip, they've always been a guilty pleasure combo of mine.


Now, dips often get a bad rep.  And for good reason!  However, there are lots of healthy dips out there!  I got this great dip serving dish and light dip book from my friend Rebecca a few months ago called Skinny Dips, and it has some awesome recipes in it!  One of my favorite things to do is substitute nonfat Greek yogurt for sour cream in dip recipes, which turns out great every time!


Of all the dips I love, French onion is definitely one of my favorites (with Utz potato chips or Fritos, of course!).  It's salty and crazy addictive.  I love trying to recreate my favorite unhealthy flavors in healthy ways.  That's how the recipe for French Onion Chicken was born.

The reviews on this one were great, even as leftovers!  I took some beautiful pictures too, but the memory card wasn't in the camera...oops!

French Onion Greek Yogurt Chicken

Ingredients (I only made one serving for tonight to test out the recipe since I've never cooked with yogurt before…just multiply the ingredients out if you want to make more!):
- 1 boneless, skinless chicken breast
- 1/3 cup plain nonfat Greek yogurt
- 1 tsp French onion dip mix
- 1 tsp minced parsley
- Freshly cracked salt and pepper

Preparation:
-Preheat oven to 375F
-Season chicken on both sides with salt and pepper
-Coat chicken in Greek yogurt mixture; let sit for 10 minutes
- Bake for 35-40 minutes until chicken is cooked though.

I served this chicken recipe with balsamic broccoli and brown rice.  Enjoy!


Monday, July 9, 2012

Marinated Grilled Shrimp

Here is a really fast and simple way to jazz up shrimp!  Italian seasoning, fresh parsley and a grill make this a healthy go to for hot summer days!

Marinated Grilled Shrimp

Ingredients (serves 2):
- 10-12 medium or large shrimp, raw, peeled and deveined*
- 3 tbsp lite Italian dressing (use whatever you like here!)
- 1 tsp very finely minced parsley
- 1 tsp Italian seasoning (I buy the Italian seasoning grinder and find that the flavor is much better when you grind them fresh)
- Freshly cracked salt and pepper to taste

*I only had pre-cooked shrimp on hand, so I reduced the cooking time.  No one wants to eat a rubbery shrimp.

Preparation:
- Whisk together all ingredients except shrimp in a bowl
- Toss in shrimp and coat well; let sit on counter for 10-15 minutes


- Thread shrimp onto a skewer for easy grilling


- Pour remaining marinade over shrimp skewer
- Throw on the grill for 2-3 minutes per side; basting with remaining marinade as they cook


Enjoy!

Sauteed Vegetables with Pesto


It's almost summertime, which means it's been nice outside and therefore, I have been horrible about posting recently.  Don't worry, I have been cooking up a storm and have lots of new recipes to share as soon as I can get them up!

I made this recipe on a rainy, humid day, so our usual summer nightly routine of grilling something for dinner wasn't in the cards.  I had a basil plant that had been climbing the wall in my kitchen, so a batch of pesto was definitely the solution!

Here's a really easy and healthy way to use pesto.  Just saute your favorite veggies, add pesto and heat through.  Seriously, it's just that easy.

Sauteed Vegetables with Pesto

Ingredients:
- 1/2 cup of my Basic Basil Pesto recipe*
- 6 cups of your favorite vegetable (I used broccoli for the purposes of this post)
- Cooking spray
- Freshly cracked salt and pepper to taste
*I didn't have a food processor on hand, so our not so great smoothie maker was a stand-in.  Turned out a little too finely pureed for my preference but the taste was still spot-on.

Preparation:
- Spray a nonstick skillet with some nonstick cooking spray and heat on medium-high heat
- Add your veggies and saute until golden brown


- Add half a cup of pesto (try my homemade version; it's really good!) or a little more to your taste.


- Heat through but be careful not to burn.


Tah-dah!  The finished product

I served the pesto broccoli alongside some simple pan-seared salmon and whole wheat vegetable couscous.


This recipe even made enough for leftovers, which will be delicious in somebody's lunch tomorrow...


Happy experimenting with pesto and your favorite veggies!

Monday, May 21, 2012

Basic Basil Pesto


Pesto is the best accompaniment to almost any savory dish in the summertime.  I highly recommend always having  a fresh basil plant in your kitchen because fresh herbs make a HUGE difference in recipes.

Here is a basic recipe for pesto since basil is one of my favorites!  It's adapted from a bunch of recipes I've seen and tried over the years.

Basil Pesto
- 5 cups fresh sweet basil leaves (this is a lot, so plant huge basil plants if you have the room)
- 1/2 cup walnuts, chopped*
- 1 head garlic, minced (usually about 10 cloves)...I love garlic because I grew up with it in my Italian household but feel free to use less if this is too much for you!
- 1 cup Parmesan cheese, grated
- 1 cup olive oil
- Freshly cracked salt and pepper to taste

*Pignoli or pine nuts are traditionally used in this recipe but I prefer the taste of walnuts.

Preparation:
Put all ingredients except olive oil together in a food processor and pulse until texture is chunky.  Slowly add olive oil while pulsing.  Stop when the mixture is fine but you can still detect small bits of basil.  You want some of the bright green color in tact.

Pour over pasta, veggies or meat.  Also makes a very flavorful marinade!  I know someone who put this all over a leg of lamb and threw it on the grill...very good reviews!

Another suggestion is to substitute spinach leaves for some or all of the basil  Great way to get some veggies into your kids!

You can store this in the fridge for several days or in the freezer for a few months.

Meatballs with Pesto Pasta

I had lots of leftover beef from making Burgers with Balsamic Red Onions, so I decided to repurpose the mixture into another recipe.  There was pesto in the fridge, pasta in the pantry and thus, these meatballs were born.

Meatballs with Pesto Pasta

Meatball Ingredients (note: this made 3 servings but it makes 4 if you use a whole pound of beef):
- Beef mixture from my Burgers with Balsamic Red Onions recipe (I used about 2/3 of the original recipe that was leftover in raw form but if you increase the beef, just add a little bit more of everything below)
- 1 egg
- 1/2 cup Italian bread crumbs
- 2 cloves garlic, minced
- 1/4 cup Parmesan cheese, finely grated
- Freshly ground salt, pepper and Italian seasoning to taste (yes, we have an Italian seasoning grinder, too!)
- Pinch red pepper flakes

We used store bought pesto and whole wheat angel hair pasta for this recipe.  Explanation of how store bought pesto appeared in my fridge below...

Preparation:
- Mix all ingredients by hand and roll into balls (surprisingly, this made 15)
* Can you still see all of that green onion from the previous recipe?  YUM.


- Saute on medium heat for about 10 minutes, turning every few minutes; drain on a paper towel to remove excess grease from beef and set aside


This is the pesto that we used.  Somebody who shall remain nameless happens to work right next to Whole Foods, so there are always ridiculously overpriced sauces and other items appearing in my fridge. Even though we have a plant full of delicious basil leaves right on the window sill...*sigh*.

It was pretty good but nowhere near as good as homemade.  Since it happened to be in my fridge, I didn't want to waste it.  We ended up enhancing the basil flavor with freshly snipped basil leaves from our plant, so it still tasted pretty fresh!


For the record, I always make my own pesto with basil, walnuts, Parmesan cheese, garlic, olive oil, salt and pepper.  It's so easy to make and always incredibly delicious.  Check out my basic basil pesto recipe here.

I digress...on with the recipe:

- Add pesto to pan and heat through


- Add 3 servings of your favorite cooked pasta, the meatballs and some freshly snipped basil to the pan
- I also added 1/2 cup of reserved pasta water to the pan to create a thicker sauce (ALWAYS reserve about a cup of pasta water any time you're making pasta with sauce.  You never know when you're going to need it)
- Stir to coat and serve!


Pesto is one of my absolute favorite summer treats so be sure to try it out this summer in some new and innovative ways!

Burgers with Balsamic Red Spring Onions

This week, I am featuring an ingredient I've never used before.

Red spring onions....aren't they gorgeous?


What to do with these locally grown beauties?


Well, I had taken some lean ground beef out of the freezer the day before and was looking for some inspiration to use it.  I came up with this burger recipe, which actually uses both the stem and the bulb in different forms!

Burgers with Balsamic Red Spring Onions

SO easy to make.

For the Burger (makes 4 servings):
- 1lb lean ground beef
- 1/4 cup green onion, chopped
- 2 tbsp reduced fat mayonnaise (I call this "moisture insurance")
- Freshly cracked salt and pepper to taste
- 4 slices of your favorite cheese to melt on top (we used swiss, which melts REALLY well)

Burger Preparation:
- Mix all ingredients together but be careful not to overmix


- Form into 4 evenly-sized patties (I made 3 this time because my audience was extra hungry- this should make 4 servings)


- Close-up of those fresh green onions


- We chose French baguette because we had some leftover from the day before


For the Caramelized Balsamic Red Onion Topping:
*I made this in a saute pan and kept it hot in foil while the burger was on the grill.  It was legitimately like butter.

Ingredients:
- 2 cups red spring onions, sliced (for 4 burgers- feel free to use more onions if you like more topping!)
- 1 tsp olive oil
- 2 tbsp balsamic glaze (this is just a reduced balsamic vinegar)
- 1 cup water- I know this is an odd ingredient but it really helps to soften the onions and caramelize them quickly so they don't burn
- Freshly cracked salt and pepper to taste

Preparation:
- Add oil and onions to hot pan


- Add little bits of water throughout the cooking process and cook until evaporated


 - Cook about 10-15 minutes on medium heat until onions are soft and sweet
- Add balsamic glaze about 2 minutes before you take onions off the heat

- Get your burger on the grill- about 3-5 minutes per side depending how you like your burger cooked


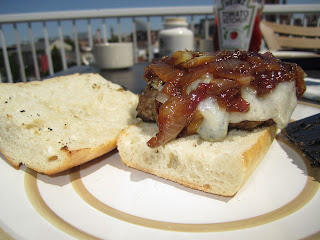
Et voila!  We topped this burger with a slice of swiss and the balsamic red spring onions.


Don't be fooled; that ketchup never even got opened.

The reviews for this one were outstanding.

*This recipe is extra fabulous because not only were the burgers delicious, but I ended up using the leftover ground beef to make Meatballs with Pesto Pasta the next day!

Monday, May 7, 2012

"Fried" Brown Rice

I LOVE Chinese food.  When I say love...it's because Chinese food is everything I love about my favorite foods.  It's salty, filling, satisfying, bad for you (even healthy chefs can admit their weaknesses, right?) and most of all, reminds me of being a kid.  When I was little, we used to take family trips with my cousins to Hunt Valley Szechuan (anyone remember that place?).  No meal was ever complete without veggie lo mein and fried rice.

DO YOU HAVE ANY IDEA HOW BAD FRIED RICE IS FOR YOU?  Seriously, any idea?  For that matter, do you know how unhealthy most Chinese food is, in general?

Oil, on top of salt, on top of fat. Yikes.

Fast forward a few years and here I am, trying to perfect Chinese recipes with a healthy DNA.  So far, I've done a pretty good job!

So, here is my recipe for "fried" brown rice.  I don't use any oil other than nonstick cooking spray and I don't use white rice.  Trust me when I say this recipe is worth trying.

Ingredients (4 servings):
- 3 eggs
* I sometimes even add a few extra whites in here because everyone knows eggs are one of the world's most perfect foods
- 2 packages of prepared, frozen brown rice; cooked according to package directions (why would I do all that work cooking dry rice if someone else has already done it for me?)
- 1 handful carrots, sliced finely
- 1 onion
- 3 cloves garlic, finely pressed
- 2 cups fresh or frozen stir-fry veggies (to save time, you can sometimes find these in the produce aisle already chopped- I used green beans, sugar snap peas, carrots, water chestnuts, peas)
- 3 tbsp low sodium soy sauce
- 1 tbsp light brown sugar (don't omit this one)
- Canola oil nonstick cooking spray
- Freshly cracked salt, pepper and red chili flakes to taste

Preparation:
- Spray nonstick skillet or wok with nonstick cooking spray; heat on medium-high
- Add all 3 eggs at the same time; scramble in pan very quickly.  Be sure to break them up finely.  Remove from pan and set aside.
- Add onion and carrot; saute until translucent
- Add brown rice and stir "fry" on high for about 5-7 minutes
- Add garlic and cook for 2 minutes (don't burn it!)
- Add veggies and eggs back to pan
- Add remainder of ingredients
- Continue to cook on high until the veggies are heated through and have a little bit of caramelization (do not overcook or you will have soggy veggies!)

*Note: I sprayed the rice a few times during the cooking with a little bit of the nonstick cooking oil to add a llittle sheen without actually frying the rice in a puddle of oil like they do in Chinese restaurants.

Look at all those eggs...mmmmmmm...I had to pry myself away from the pan


Finished product!  I served our guests' fried rice with shrimp tonight, but you could use chicken, tofu, lean steak...whatever you want!


  Happy healthy Chinese cooking!!

Easy and Healthy BBQ Chicken

BBQ chicken is a summertime grill staple in our house.  We absolutely love grilling out on our roof deck and since we had some friends in town, and not a lot of time, it was a perfect excuse to whip up a little quick, easy and healthy BBQ chicken.

There are only two ingredients besides salt and pepper...didn't I tell you this was easy?

Ingredients:
- Boneless, skinless, trimmed chicken breasts
- BBQ sauce (any kind you like; use as much or as little as you like) -- we used Jack Daniels Original #7
- Freshly cracked salt and pepper to taste

- Place chicken in any kind of dish
- Pour BBQ sauce over chicken; massage sauce into chicken well
- Marinate for 30 minutes (or longer if you have time!)


- Place chicken on hot grill for about 5 minutes per side; baste with leftover BBQ sauce throughout cooking process


- Grill until just cooked through (is one already missing?)


We served this grilled BBQ chicken with roasted rosemary potatoes and garlicky green beans.  Since we were entertaining, we also had a light salad course of insalata caprese.  Perfect Sunday night rooftop feast! 

Insalata Caprese

Also known as tomato mozzarella...one of my favorite things about being Italian is being able to claim this salad.  My French fiance is constantly asking for it but alas, tomatoes have not been in season.  I did spy with my little eye some ripe, red tomatoes at Shoppers over the weekend (of all places!), so I jumped at the chance to bring summer to my dinner table.  We served this as an appetizer for some grilled chicken and veggies...it was so refreshing!

Is there anything more perfect than this (measurements are according to your taste; there is no right or wrong way to do this but don't overdo it on the cheese or it becomes unhealthy very quickly!):

- A few slices of tomato (be generous here, tomatoes are good for you and very healthy!)
- 2-3 very thin slices of fresh mozzarella cheese (here's where we all go overboard...sigh)
- Chopped fresh basil (only use fresh and grow it yourself if you can...trust me on this one)
- A very light drizzle of olive oil
- A very light drizzle of aged balsamic vinegar
- Freshly cracked salt and pepper

Preparation:
- Slice tomatoes and mozzarella
- Chop or julienne fresh basil leaves (or leave whole, if you prefer)
- Alternate tomato, basil and mozzarella; drizzle with balsamic, olive oil, salt and pepper


This one was my plate- I didn't want to overpower the freshness of the tomatoes and basil by using olive oil and vinegar but everyone else dug right in!


I dare you to find someone who doesn't like this at a dinner party.

An awesome and lower-maintenance variation on this is to use tiny mozzarella balls or even cubed mozzarella with grape tomatoes.  It can be mixed in advance with olive oil, vinegar and basil for a delicious salad to bring to cookouts!

*Side note: I buy basil plants and keep them in my kitchen for whenever I'm dreaming of Italian food...which is several times per week.  Try it at home- all you have to do is water it a few times per week 

Garlicky Green Beans

We had some lovely visitors this weekend.  Our friend came in town with his daughter and the weather was beautiful, so we decided to grill outside.  Since we have limited grill space, and no indoor grill pan yet (wedding registry?), we decided to saute up some green beans.  Can't wait to try them on the grill!

Here's how that recipe goes and ohmygoodness were they delicious:

Ingredients (serves 4):
- 1 lb green beans
- 4 large cloves of garlic, pressed very finely
- 3 tsp olive oil
- freshly cracked salt and pepper

Preparation:
- Add oil to cold nonstick pan
- Heat pan to high heat
- Add green beans once oil is very hot


- Saute green beans for 5-7 minutes on high heat to get some color


- Press garlic and add to green beans when they are al dente


- Cook for 2-3 more minutes; be careful not to burn garlic!


Enjoy with any kind of protein or all by themselves!

Note: adding a little bit of low sodium soy sauce and a few tsps of sesame seeds turns these into easy szechuan green beans!  You could also add a handful of sliced almonds and just 1 tsp of butter to make healthy green beans almondine!